Bike Repair & Maintenance Part 2 - Torque Tools
Posted by Chris on Aug 21st 2024
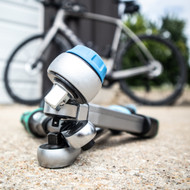
So if you’re interested in doing some or all of your own bicycle maintenance at home, there are a few tools that are indispensable. I’ve covered some of the basics in the previous post, but one topic I’ve left for its own supplemental post is the topic of bikes and torque wrenches.
First off, as more and more bike frames and parts are being made of carbon fiber, it’s important to make sure that you are tightening parts correctly: not tight enough and it becomes a safety risk, too tight risks cracking or premature fatigue. And don’t assume that just because you only have aluminum or steel parts, you don’t need a torque wrench: many lightweight metal bits can easily be bent or cracked by overtightening. So, having a torque wrench is a smart investment. Most manufacturers will list the recommended torque tightening value right on the part (seatpost, handlebars, stem, etc.), and a torque wrench takes the guesswork out of it.

So what torque wrench do you need? Well, for most general tasks like adjusting your handlebars, stem, seatpost, etc. one torque wrench in the neighborhood of 2 – 20 Nm (Newton-meters) will handle most of your tasks safely and easily. If you already have a set of sockets, you can buy just the wrench itself. This set is also a handy one that uses a standard ¼” bit socket in the ratcheting head instead of a ¼” square drive.

If you’re really diving headlong into your bike maintenance, you might want to invest in a second torque wrench that is in the 20 – 60 Nm range. A threaded bottom bracket needs to be tightened to around 40 Nm depending on manufacturer and type, and if you want to be really observant, you can also use it to tighten your cassette lockring, disc brake rotors, and pedals to the factory recommended torque as well. (Hint: a 1” socket fits many of the lockring tools.) Personally, I prefer a 3/8” drive rather than ½” only because many of the special splined tools to tighten bottom bracket cups have a 3/8” square drive insert.

Now one detail to remember is that the right cup of the bike’s bottom bracket (and the left pedal) has a left-hand thread (counter-clockwise to tighten), and many torque wrenches only tighten in a clockwise rotation. There are a couple of solutions. You’ll want a type of torque wrench that either has a square drive coupler that you can push through or flip over (like the Gedore one linked above), or one with a removeable insert like this one, for example. In this case, the torque wrench has a 9 x 12 mm rectangular socket on the end which can fit a variety of inserts such as a bit holder, square drive coupler, open end wrench, etc. The advantage is in its versatility, but it does cost more, as you need to purchase the end fittings separately.

While torque wrenches can be a bit of an investment, they can more than pay for themselves over the long term in the peace of mind you get, knowing that every part will be safely snug. Remember to always turn the torque wrench scale back to its lowest point after use, and keep it clean. You’ll likely get a lifetime of use out of it, and your bike will thank you.
First off, as more and more bike frames and parts are being made of carbon fiber, it’s important to make sure that you are tightening parts correctly: not tight enough and it becomes a safety risk, too tight risks cracking or premature fatigue. And don’t assume that just because you only have aluminum or steel parts, you don’t need a torque wrench: many lightweight metal bits can easily be bent or cracked by overtightening. So, having a torque wrench is a smart investment. Most manufacturers will list the recommended torque tightening value right on the part (seatpost, handlebars, stem, etc.), and a torque wrench takes the guesswork out of it.

So what torque wrench do you need? Well, for most general tasks like adjusting your handlebars, stem, seatpost, etc. one torque wrench in the neighborhood of 2 – 20 Nm (Newton-meters) will handle most of your tasks safely and easily. If you already have a set of sockets, you can buy just the wrench itself. This set is also a handy one that uses a standard ¼” bit socket in the ratcheting head instead of a ¼” square drive.

If you’re really diving headlong into your bike maintenance, you might want to invest in a second torque wrench that is in the 20 – 60 Nm range. A threaded bottom bracket needs to be tightened to around 40 Nm depending on manufacturer and type, and if you want to be really observant, you can also use it to tighten your cassette lockring, disc brake rotors, and pedals to the factory recommended torque as well. (Hint: a 1” socket fits many of the lockring tools.) Personally, I prefer a 3/8” drive rather than ½” only because many of the special splined tools to tighten bottom bracket cups have a 3/8” square drive insert.

Now one detail to remember is that the right cup of the bike’s bottom bracket (and the left pedal) has a left-hand thread (counter-clockwise to tighten), and many torque wrenches only tighten in a clockwise rotation. There are a couple of solutions. You’ll want a type of torque wrench that either has a square drive coupler that you can push through or flip over (like the Gedore one linked above), or one with a removeable insert like this one, for example. In this case, the torque wrench has a 9 x 12 mm rectangular socket on the end which can fit a variety of inserts such as a bit holder, square drive coupler, open end wrench, etc. The advantage is in its versatility, but it does cost more, as you need to purchase the end fittings separately.

While torque wrenches can be a bit of an investment, they can more than pay for themselves over the long term in the peace of mind you get, knowing that every part will be safely snug. Remember to always turn the torque wrench scale back to its lowest point after use, and keep it clean. You’ll likely get a lifetime of use out of it, and your bike will thank you.

 Tool of the Day™
 Essentials
 The Seasonal
 New Arrivals
 Staff Picks
 Sale
Sale
 Clearance
 Wera
Wera
 Knipex
 Hazet
Hazet
 Stabila
 Felo
Felo
 NWS
NWS
 Heyco
Heyco
 Bits & Accessories
 Cutters & Pincers
 Pliers
 Ratchets & Sockets
 Screwdrivers
 Wrenches
